
Saturday, May 2, 2015
Old Tobacco Road - Clue 2 - Bonnie Hunter - Mystery Quilt
Pinwheels! Lots and lots of pinwheels. I am heading for retreat so take the time to kit up the rest of this quilt. Oh yeah baby! The process takes a bit of time as I need to make sure I have enough of each color cut for the pinwheels, but the task is soon complete and I am ready to pack it for retreat.


Thursday, April 30, 2015
April Quilt Update
Links to Our Quilt World and Our Quilt Blogs Facebook Groups. Come be a part of us. Both groups also can be found at the top of the blog using the tabs. Any links that you click in this post will open in a DIFFERENT window, allowing you to continue reading this without losing the page.
I have moved the previous posts to the end of the entry. I hope that you make it that far.
Goals:
Round Robin (RR) blocks (14) for blue/gold top - put into row, attach, and mail by April 28th - yes
Zyra Tea Set completed - yes
Wanderlust (W)- quilt, attach binding, label, binding on - yes
BOM blocks (3) complete - yes
I have moved the previous posts to the end of the entry. I hope that you make it that far.
Goals:
Round Robin (RR) blocks (14) for blue/gold top - put into row, attach, and mail by April 28th - yes
Zyra Tea Set completed - yes
Wanderlust (W)- quilt, attach binding, label, binding on - yes
BOM blocks (3) complete - yes
Easy Street (ES) Clues 5, 6, 7, yes 8 - nope
Orange Crush (OC) Clue 6 (top made), back, binding, label - yes
3 Group Christmas Blocks made - no
4 Personal Christmas Blocks made - no
Bow-Dacious (BD) set, sandwiched, quilted, labeled, binding on - set, sandwiched, started quiliting
Prepare for retreat - yes
Old Tobacco Road (OTR) - fabrics selected and clues 1,2 - yes to fabrics and clue 1
 1st - It's APRIL!!! That means that retreat is at the end of the month and I have oh so much I want to accomplish before that. I also have grands this month so we'll see how it goes. I am spending today working on the blog and making sure I start out the month current. Oh yeah -- and it's time for ES Clue 5. This is a quick and easy clue that I loved putting together. Aren't these colors just yummy? For more on this clue please check out this LINK.
2nd - Today's mission is to finish the OC top. I get the borders on and the label made. I do love this one even though I wasn't sure I would at first. Too fun and oh so scrappy.
Orange Crush (OC) Clue 6 (top made), back, binding, label - yes
3 Group Christmas Blocks made - no
4 Personal Christmas Blocks made - no
Bow-Dacious (BD) set, sandwiched, quilted, labeled, binding on - set, sandwiched, started quiliting
Prepare for retreat - yes
Old Tobacco Road (OTR) - fabrics selected and clues 1,2 - yes to fabrics and clue 1
1st - It's APRIL!!! That means that retreat is at the end of the month and I have oh so much I want to accomplish before that. I also have grands this month so we'll see how it goes. I am spending today working on the blog and making sure I start out the month current. Oh yeah -- and it's time for ES Clue 5. This is a quick and easy clue that I loved putting together. Aren't these colors just yummy? For more on this clue please check out this LINK.2nd - Today's mission is to finish the OC top. I get the borders on and the label made. I do love this one even though I wasn't sure I would at first. Too fun and oh so scrappy.
Wednesday, April 29, 2015
Making a Portable Design Wall
When Mister asked what I wanted for my birthday, I only asked for two things. One was a portable design wall. Today we are tackling that project.
We have purchased two sheets of foam core board and the guy at Home Depot was kind enough to cut them for us into 4 2x6 pieces and 2 2x4 pieces. We are only going to tackle the large ones this time. While Mister is at work, I attach some crazy yellow/black fabric to the bottom edge of my white flannel to give it a "kickboard" effect. This may stop people from walking into the bottom edge and sending the whole thing flying. It might not, but it's worth a try -- PLUS Mister thought I had cut the flannel just a bit too short. Dual purpose attachment.

We have purchased two sheets of foam core board and the guy at Home Depot was kind enough to cut them for us into 4 2x6 pieces and 2 2x4 pieces. We are only going to tackle the large ones this time. While Mister is at work, I attach some crazy yellow/black fabric to the bottom edge of my white flannel to give it a "kickboard" effect. This may stop people from walking into the bottom edge and sending the whole thing flying. It might not, but it's worth a try -- PLUS Mister thought I had cut the flannel just a bit too short. Dual purpose attachment.

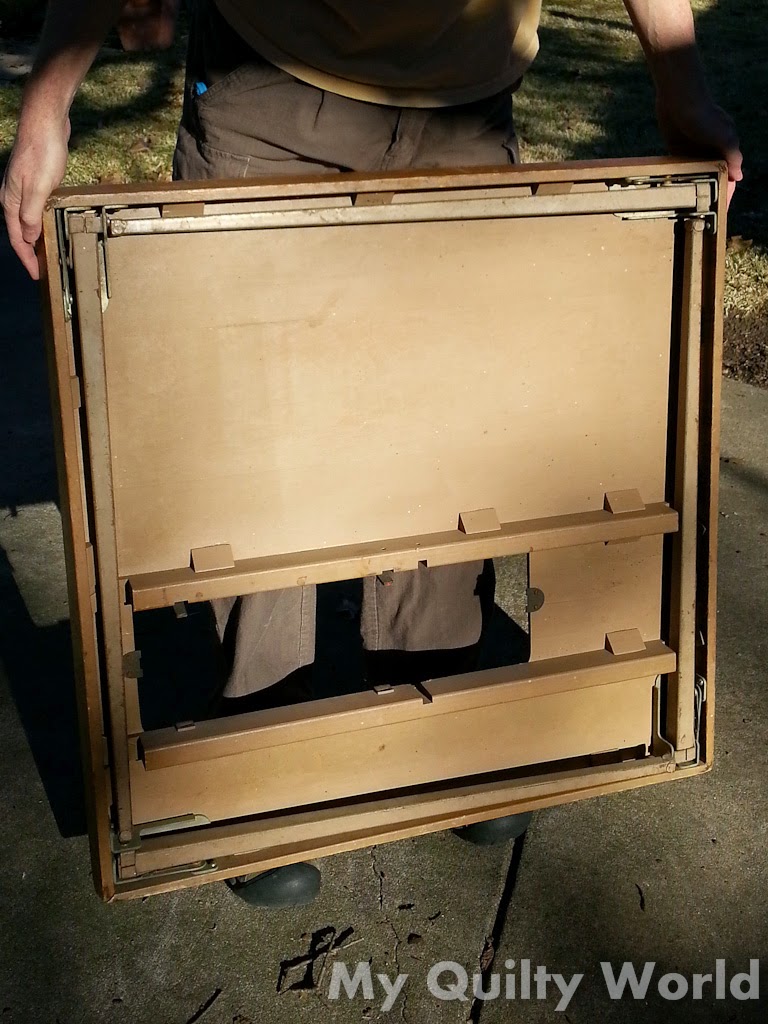
Restoring A 301 Table
It all started Jan 17 while we were out antiquing. We stopped in at a store in Garland where I spotted three "card" tables in a back room. I knew right away what they were and went to the front to inquire as to the price of them. Once I had a price, I called a friend and wanted to know if she wanted one of the 2 Featherweight tables. Of course she did. I wanted the 301 table for myself but it was missing the insert so I went back up front to negotiate the price. Once we agree on a price, back to the room I went to really look at the third table. We came to the conclusion that it was not worth the price as it had severe issues and may not even be able to work as a Featherweight table again. We took the two tables up front and explained to her about the third table. She told us to just take it off her hands for free, so Mister went back to retrieve it as well. Three tables walked out the door with us and I was floating.
Here are the before pictures of my 301 table:

Saturday, April 25, 2015
A Binding Tutorial
Ms. Sharron Evans asked me to do a tutorial on how I apply binding. It is not my own method, but one that I was taught. Many use this method but here is the tute anyway.
I make the binding itself by sewing 2 1/2" strips together with a bias seam -- this part is not shown -- then I press it in half with right sides out. Now to apply:
On one side of the quilt, about halfway down, place the binding on the quilt with raw edges together and leaving about a 6-8" tail of binding behind the starting point, sew the binding to the quilt in a 1/4" seam. I do not pin --- just place my binding as I sew.

I make the binding itself by sewing 2 1/2" strips together with a bias seam -- this part is not shown -- then I press it in half with right sides out. Now to apply:
On one side of the quilt, about halfway down, place the binding on the quilt with raw edges together and leaving about a 6-8" tail of binding behind the starting point, sew the binding to the quilt in a 1/4" seam. I do not pin --- just place my binding as I sew.

Thursday, April 23, 2015
Easy Street - Clue #8 - Bonnie Hunter - Mystery Quilt
 Clue 8 has been here for quite awhile! Yes, please meet Procrastination Debi. I have had this on the back burner for quite awhile now and am just realizing that I want this set of posts finished by year end. Time to kick it in gear. It is the middle of November and I am now going to set this beautiful quilt. First up: blocks. Block A is in stacks of nice little units and I need to lay out 16 of them I grab my medium portable design board and start stacking them up. I want to take these with me to retreat and perhaps start putting them together as leader/enders and be able to do a small mini-class on webbing with them.
 It works beautifully as a leader/ender project while at retreat and I manage to get a few finished. Yep, you read that right. A few. Oh my --. I even get one of the "B" blocks finished to see what they will look like too. That's it though.
Fast forward to mid December. I have finished a few more blocks as leader/enders but now I HAVE to focus on these blocks. Block A is complete.

Here are my block B's laid out along with the single B


 December 17 and I am sewing the B blocks. I have them finished and quickly run into the house to lay out my center. First I have to find the setting and corner triangles that we made in clue 7. Oh my. I absolutely love it.

 12/29 Oh my time sure has passed on this one. Now to finally do the last step of setting this sweetheart. I have learned that "on-point" quilts set better in halves so that is the process that I use. I work one corner down to the center and then start the process over with the other half. It takes me less than two hours of listening to my lovely Annie stitching away and then I have a center ready for borders. Oh yeah.

 Another hour later and I have the pink inner, turquoise outer, and purple binding made. It's coming together but now I need to focus on something else today. I am hoping to get this finished this year. Time will tell.
2/15 I am back at this. Obviously it did not happen by the end of last year. Ugh --- sometimes I can be oh so pitiful. Today the pink borders are going on. Woohoo.
I'm liking the contrast that these give.


 Next up is the turquoise outer border. A quick measure and I am soon sewing these on as well.
This one is way too big for the living room floor. Oh my, I'm scared to quilt it. Label is ready as well, I just need the back now.


 3/4 It seems like this crosses my radar every month or so and I now have it with me in Abilene while I am helping Jen recover from surgery. It's time to get this dang back together. I finish up the scrappy middle strip and sew my two sides on. Yay -- that was painless.
Oh wait, dang it is not big enough. Time to frog off a side and add another strip of scraps. Do I even have enough still? It's magic time. Once another scrappy strip is added, I reattach the outer piece and yes -- it is big enough now. Whew. I barely have any scraps left now.


UPDATE: October 20, 2016. It is on the frame.

UPDATE TWO: 1/10/2017

 I'm going to get this sweetie quilted today. The sun is shining and it's quite lovely out. I think it has languished in the frame long enough. Out to the studio I go and after filling bobbins, I am up and running. I like it so keep going.

 On about the fourth bobbin, things start to go awry. Isn't this lovely? I get it all picked out, give the machine a once over and try again.
Perhaps luck is on my side as I am able to finish out that bobbin and then move onto filling some more. Is this the problem?

After having the same issue repeatedly for 6 attempts with me cleaning the machine, changing needle, adjusting tension, and whatever else I can think of, with tears streaming down my face in frustration I call it ENOUGH for today. The quilt is about 3/4 finished and it can sit for awhile until I'm not emotionally at the point where I want to beat the machine. Maybe tomorrow. Maybe not.

 UPDATE 2 - 9/29/17 That's right. It is almost a year later. My quilt has been in this frame since October 20, 2016. Since January 10 of this year, it has sat in "time out." Yesterday, I went out to the studio determined to solve the problem. After clearing a path in a studio that I have just not taken care of lately, I have room to maneuver. Turning the machine on, and crossing my fingers, away I went. OMG. It worked. I did NOTHING different to it. Well, at least that I was aware of. I even switched out a bobbin and no problems. A quick glance told me I was getting near the end and believing to have about three swaths left, I ran out of bobbin again forcing me to refill one. I went into the house, refilled the bobbin, put it into the machine and away I went --- to a mess again. GRRRR. Throwing my hands in the air, I give up for the day.

 That brings me to today. Back to the studio I go, with a renewed effort to talk sweet to my machine. Maybe if she knows how frustrated I am, she will help me. Hey, a girl ca hope can't she? I clean the machine thoroughly, start it up and voila --- a mess again. Now, please keep in mind that I am running a test piece EVERY time before starting on the quilt itself. They are perfect. As I go to move the machine back to the far left so that I can roll the quilt to pick out the mess, I notice that the presser foot is up. WHAT???? Have I been doing that a lot??? In the past, if the presser foot was left up, it would jam the entire machine, not just leave an eyelash mess. HMMMMMM. I am totally confused now. After cleaning the mess up again, I again clean the bobbin case thoroughly and try a test again. Perfect. Okay, here goes nothing. Making sure that the presser foot is down, I start it up again and she runs wonderfully. I am able to finish the last few swaths and this baby is coming off the frame. Oh WOW. I kept ALL the threads I have pulled on this project ---- it's a crazy amount. I have no idea if that was the problem or not. Time will tell.

 Immediately, I take the quilt into the house to trim the edges with a little help from Mister. Now it needs to be squared up and the binding attached. There's just one little problem with this. The studio is a disaster. After two hours of cleaning, I have cleared an area, squared the quilt, pinned the label on, and am ready to add the binding. Whew. One hour later, I am at the hand stitch point and no longer dependent on a machine to finish this humongous baby. Stay tuned.
October 27 -- All binding is sewn down. I can call this sweetheart DONE. I'll do an upright, outdoor picture within the next couple of days and then this post will be complete. Thanks for hanging in there with me throughout it all.


Finished Upright Pictures -


Tuesday, April 21, 2015
Old Tobacco Road - Clue 1 - Bonnie Hunter - Mystery Quilt
FOUR PATCHES!!! Here we go again. Clue 1 has us making a couple hundred of these little buggers. The first thing I do is look in the box of leftovers from Orange Crush and instantly I have 21 units ready to go. Yay me but the problem is that that is only about a 10th of what I need. Time to sew strips again.

 I am working on several projects at once and decide to do strip sets as leader/enders. It is amazing how quickly my stack builds and soon I am making the subcuts for my units.
I have enough for about 100 of them but that is not enough so I start in again with more leader/enders until I have enough subcuts to really start chaining away.
I am working on several projects at once and decide to do strip sets as leader/enders. It is amazing how quickly my stack builds and soon I am making the subcuts for my units.I have enough for about 100 of them but that is not enough so I start in again with more leader/enders until I have enough subcuts to really start chaining away.
Subscribe to:
Posts (Atom)